Adding Vertical Stripes To A Knitting Project

I read about this technique in the latest issue of KnitScene magazine, but then forgot where I saw it. I tried to describe it in episode 9 of the Unraveling podcast, but I started having doubts about how I was explaining it. So when I edited the episode, I cut that segment out. Then, last week, Knitting Daily published the same story, so I decided to give it a try.

We all know that if you want to add a horizontal stripe to your knitting project, you just need to change yarns, and weave in the ends when you’re done. But what if you want to have vertical stripes? This technique actually marries knitting and crochet to solve this problem.

The idea is that if you’re knitting in stockinette, when you get where you want your vertical stripe, you purl that column on the knit rows, and knit it on the purl rows. This results in a trough, or channel, on the right side that is recessed. After you’ve finished all the knit work, you switch to your crochet hook. You insert the hook, front to back, at the bottom of the column, pick up your contrasting color, and pull it to the front. Then, with the loop you just pulled through still on the hook, insert the hook in the next step of the ladder, front to back, pick up the contrasting color, pull it through, and then pull it through the loop from the previous step. This is just a regular crochet slip stitch. Continue this up the ladder, until you reach the top. Cut the yarn, and weave in the ends.

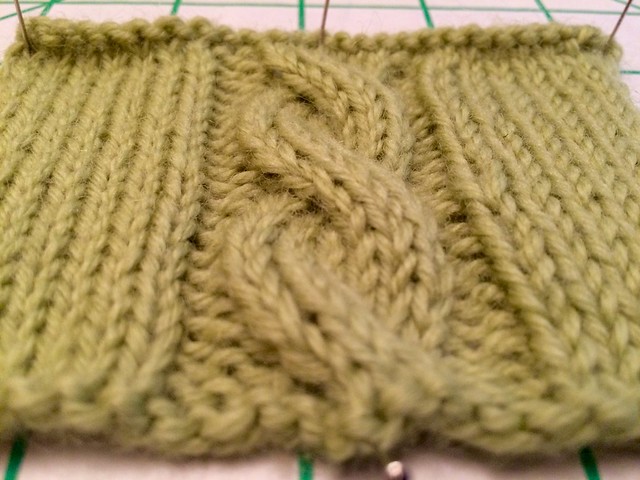
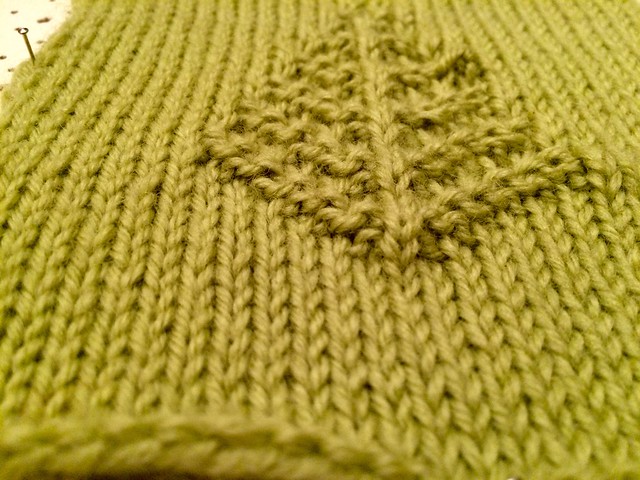
In the sample I made, I did four rows of garter stitch at the top and bottom, and three stitches of garter on the left and right, as a border. I knitted in stockinette for the rest of it, which, I think, was fourteen stitches. When I hit the seventh and eighth columns, I purled on the knit side, and knitted on the purl side. In retrospect, I should have just done a single column; I will only do one column at a time in the future.

IMG_3611IMG_3612


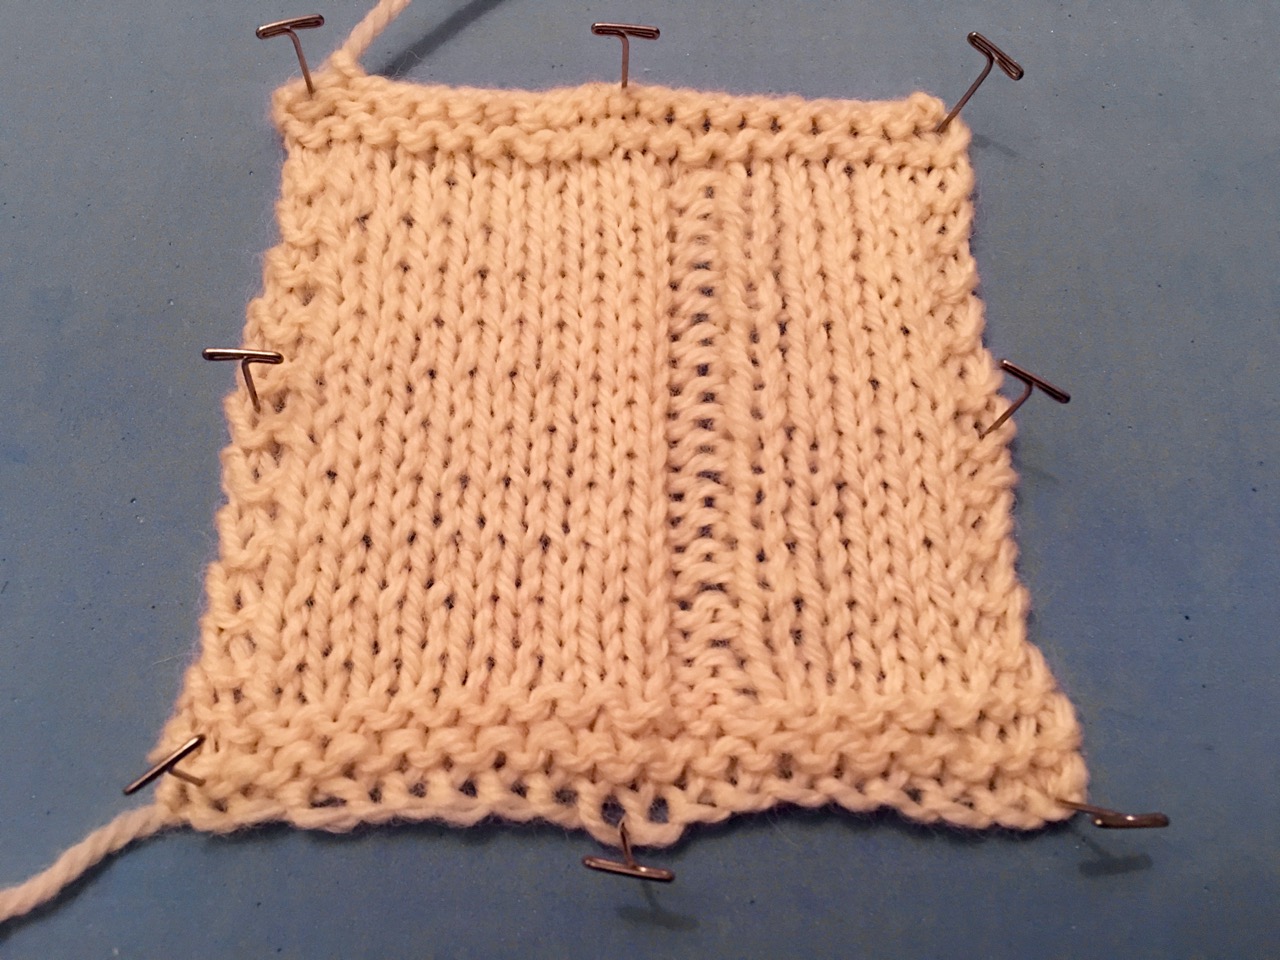
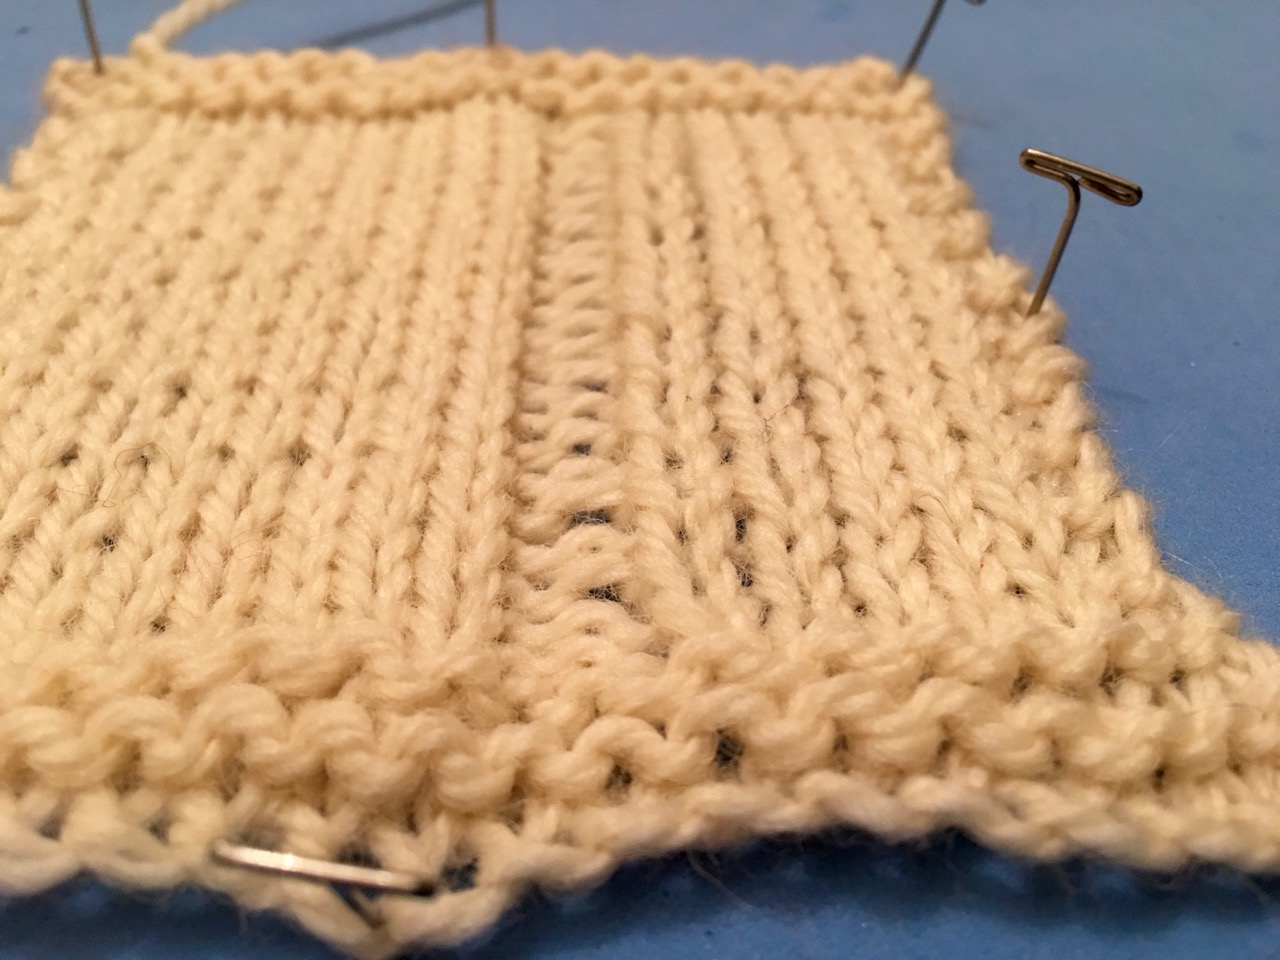
In the photo on the left, you can see the whole piece, with the recessed columns near the right. The photo on the right gives you a bit more perspective on how deep the column is.

The next step is to do the slip stitches. I failed to take a photo during the procedure, instead only taking them when I was done. You can refer to the original article to see it in action. Below are two photos showing the finished product. I didn’t weave in the ends, since it was just a test, but you would need to do that to really be finished.

IMG_3615IMG_3616


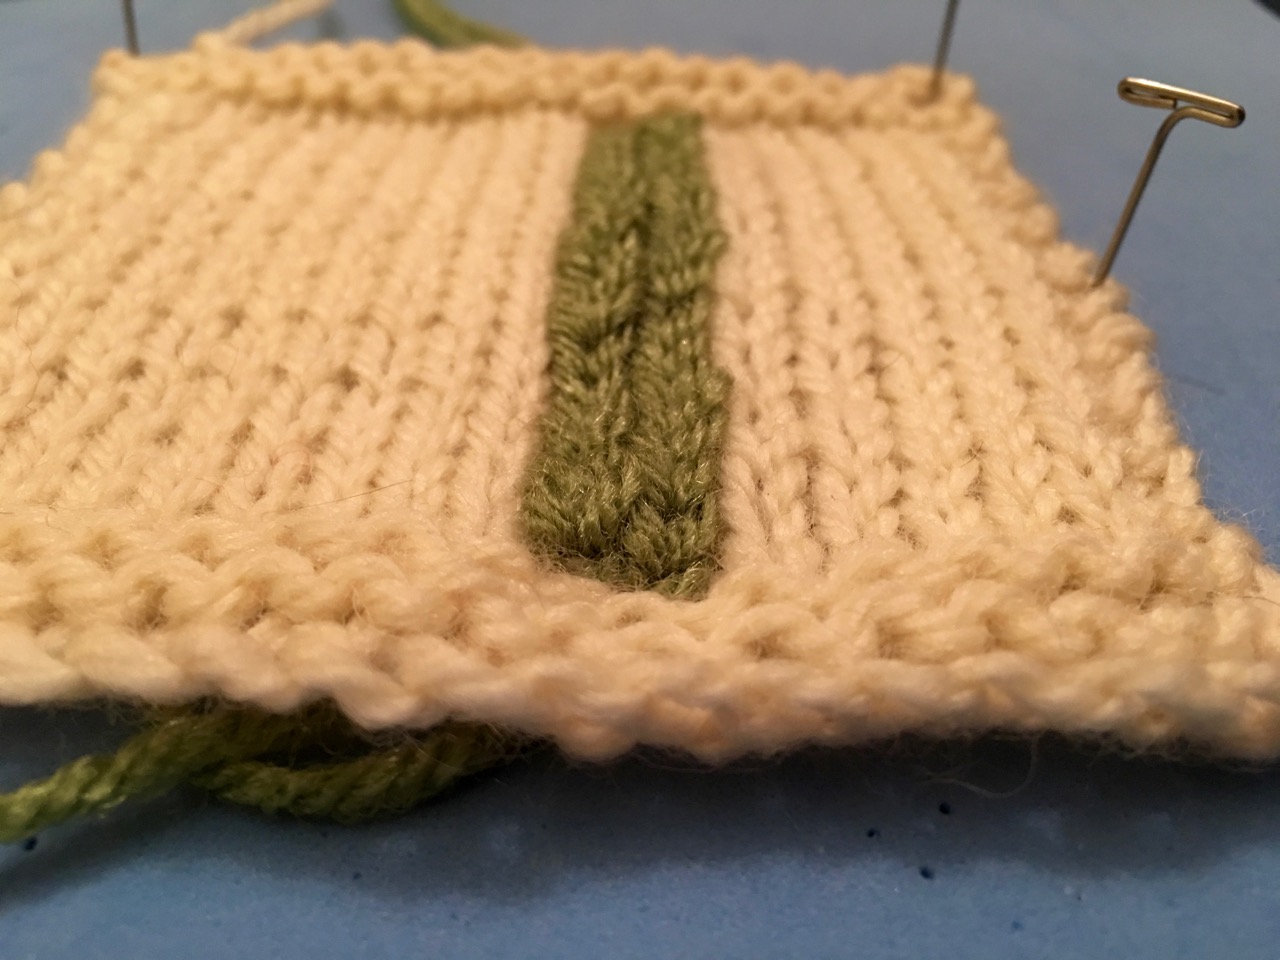
It turned out to be harder than I expected to make this stitch look good. I’ve done a lot of crochet, but the way I had to hold the fabric, and how you pulled the yarn through, made it harder. If I do this technique again, I believe I will get a crisper stripe than I got this time.

Go read the article and give it a try.

Knitting Cables Is Easier Than It Looks

IMG_2599

Last Saturday, I went on a field trip with my knitting guild to Yarn Rhapsody, in Dawsonville Gainesville, GA. While we were there, I was looking at a cable knit sweater, and I remarked to one of my guild mates about how hard it looked. She looked right at me and said, “It’s so easy, you won’t believe it.”

So Wednesday, I decided to try my hand at it. I went to Youtube, and searched for “cable knitting”, and watched the first video that came up. It’s 8:15, and really showed how easy the technique is. After watching it once, I grabbed some cheap worsted weight yarn, a set of US 6 needles, my row counter, and the cable needle that came with the starter kit I bought a couple of months ago, and started knitting.

The actual cable technique is really simple, but the field surrounding the sample from the video does still require accurate counting. I wasn’t paying attention, and ended up completely screwing it up. I ripped it out an decided to try again, but it was late, so I set it aside until I had more time.

And that’s what I did today after work. The sample in the photos took me about two hours, from start to finish. I’m sure that if you were making something like a sweater, where there are parallel cables, that it would be more difficult than this little swatch, since you’d have to keep more numbers in your head, but the basics are simple.

This was fun to make. Here’s the album.

Wee Little Socks

IMG_2583

I got the book Sensational Knitted Socks, by Charlene Schurch, from my local public library. In this book, Ms. Schurch explains the basics of sock knitting, including the parts of a sock, and the various techniques involved in creating them. The first project is what she calls a “class sock”; that is, the sock that she teaches first when she is teaching a knitting class. It’s much smaller than a regular sock, but has all the constituent parts: cuff, leg, heel flap, heel turn, gusset, foot, and toe. You cast on 32 stitches across four DPNs (double-pointed needles), five DPNs, or two sets of circular needles; less than half of what I would need for a sock for myself. I chose to use the four DPNs.

I’ve now knitted three of this sock. The first I did over several days spanning the last two weeks. I would make really good progress, and then something catastrophic would happen. Mostly this involved counting stitches only to discover too many, or too few, in such a way that the pattern was destroyed. Once or twice one of the needles slipped out, and before I could stop it, multiple stitches were heading for the hills. I corrected several problems, but in many cases, it was easier, and more aesthetically pleasing, just to unravel the whole thing and start over. The last time I started that first sock turned out to be the charm, and it took me about ten hours to finish it. It was decent, but had a glaringly obvious purl-where-it-should-have-been-knit row, which I didn’t notice until about ten rows ahead of it.

Lessons learned from this sock:

  • be fanatical about counting stitches
  • be fanatical about checking each row, to ensure the pattern is intact

I was able to do the second sock, from start to finish, in about five hours on Saturday.  The only real issue with this one was a small gap on each side of the gusset. This is a common problem when knitting socks. The biggest accomplishment with this sock was that once I started, I didn’t have to start over. And I knitted where I was supposed to knit, and purled where I was supposed to purl.

I started the third sock on Sunday, and was making fantastic progress, when I got distracted, lost count, lost a stitch, had it escape as I tried to fix it, and ended up unraveling and starting over. I got through the heel turn last night, and then resumed tonight. After a couple of hours, I was finished. I didn’t make any further errors, and it looks like it matches the second one.

Next, I’ll be moving on to an actual pair of socks, that I will actually wear.

You can see the full album at Flickr.

I’ve Taken Up Knitting and Crocheting

About two months ago, I decided to try crochet. I did this, mainly, so I could have a hobby that didn’t make much noise, that I could do while we were watching TV. My Rubik’s Cubes made too much noise, and crochet seemed like it would fit the bill. Shortly after I got started, two of my friends were both extolling the virtues of knitting, so I decided to give that a try, too. One of those friends documents all of his work at Knitting Daddy.

I’ve been mostly alternating between arts: knit one, crochet two, etc. 🙂 I’ve been posting photos of my finished objects to Flickr, but I am going to try to start posting here about the work, not just pictures of it.

Here’s what I’ve done so far. Details of all of these projects, including patterns and yarn info, can be found on my Ravelry page. I’m joeygibson over there.

First Project: A Knit Scarf

I did several test swatches before actually starting a proper project, but this is it. It took me a week to make.

FullSizeRender 2

Album: https://flic.kr/s/aHskf3eb4m

Second Project: A Knit Crown

This one was a bit silly. Several of my ukulele friends were making them, so I decided to make one, too. This one took a few days.

FullSizeRender 2

Album: https://flic.kr/s/aHskg2beCq

Third Project: Crochet Fingerless Gloves

This one was interesting. I didn’t realize when I started that they were adult smalls, so there was no way they would fit any of us. I continued making them, though, just for fun. I donated them to charity the other day, so maybe someone will get some use out of them. They weren’t supposed to be this big, but I got carried away one night, and did a few too many rows. Rather than frog them, I went ahead and made the other the same length. So they are more like fingerless opera gloves.

IMG_2476

Album: https://flic.kr/s/aHskgiD7Bv

Fourth Project: Knit Potato Chip Scarf

This one took about ten days, but I love the results. I actually bought this yarn before I had a plan for what to do with it. It’s a silk blend that really looks nice up close. I’m going to enter this in the county fair, and then my wife gets to keep it.

IMG_2525

Album: https://flic.kr/s/aHskgriFrd

Fifth Project: Adorable Cthulhu

I saw the pattern for this one and knew I had to make one. The person who posted the pattern said she crocheted it with double strands, but I just did it as a single. I figured since this was my first somewhat complicated project, I didn’t want to complicate it further by having to deal with two strands of yarn. I will make another one, eventually, with two strands.

IMG_2543

Album: https://flic.kr/s/aHskhpJUvr

Odds ‘n’ Ends

These can’t really be called a project, they are just some noodling. I bought a book called Flowers and Leaves: 70 Stitch Patterns You’ll Love To Knit, and I’ve been working some test swatches from there. The first is a little tree.

IMG_2560

Album: https://flic.kr/s/aHski3qHwX

and the second is called “Leaves of Grass”, and sort of looks like grass.

IMG_2567

Album: https://flic.kr/s/aHskeGgH8W

This weekend, I’m going to start on some socks.